Quickly Reprovision a Cloud PC | Windows 365 | Intune Portal
This article details the steps to Reprovision a Cloud PC (Windows 365) in Intune Portal. You can reset Windows 365 Cloud PC remotely from Intune Portal (Microsoft Endpoint manager admin center).
Windows 365 is fully integrated into the Microsoft Endpoint Manager admin center. This makes the life of admins easier by allowing Windows 365 management within MEM portal.
Just like you use Fresh Start to reset Windows devices with Intune, you can also recreate a Cloud PC for a user. Before a user can use a Cloud PC, you must assign a Windows 365 license to that user.
We have a similar feature in Intune where you can perform Windows Autopilot Reset which resets the device and takes the device back to a business-ready state.
The best thing about Windows 365 is you can manage your Cloud PCs like your organization’s other devices in Microsoft Endpoint Manager.
Let’s understand what exactly is Reprovisioning of a Cloud PC, background of Reprovisioning process of a Cloud PC and how to use Cloud PC Reprovisioning remote action in Intune.
What is Reprovision Cloud PC in Windows 365?
The Windows 365 Reprovision remote action deletes a user’s current Cloud PC and creates a brand-new Cloud PC instance for the same user.
There are instances when you Reprovision a Cloud PC instead of assigning a new Cloud PC instance to a user. For example, if a Cloud PC user requires a fresh start, you can consider using the Cloud PC Reprovisioning remote action.
When the Reprovision remote action starts, the user is signed off. The original Cloud PC is deleted, including all user data, applications, customizations, and so on.
Learn: How to Manage Windows 365 Devices in Intune
When to use Reprovision Cloud PC?
The Reprovision remote action lets admins Reprovision Cloud PCs. However, you must consider using this action in following cases:
- You’re testing different Cloud PC configurations and want to start with a fresh Cloud PC every time.
- The user has reported that a provisioned Cloud PC is misbehaving. So, you can ask the user to back up the data and initiate the Reprovisioning remotely.
- The user simply wants to start from a fresh Cloud PC.
- The Reprovision action can also be used when a Cloud PC is in a Failed provisioning state in the Windows 365 provisioning node. You can consider Reprovisioning to be a similar process to resetting a physical device.
Note: The Cloud PC will be reprovisioned to the current configured settings in the provisioning policy that is targeting the user’s Azure AD group.
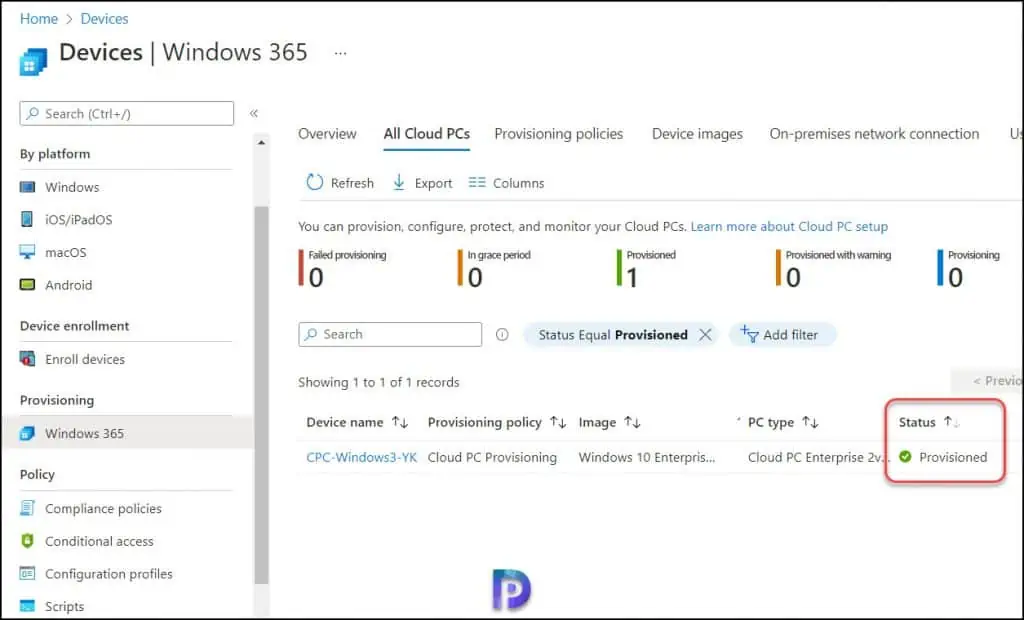
Check the Provisioning Status of Cloud PC
To Reprovision a Cloud PC, it must have a status of Failed or Provisioned in the Windows 365 provisioning node.
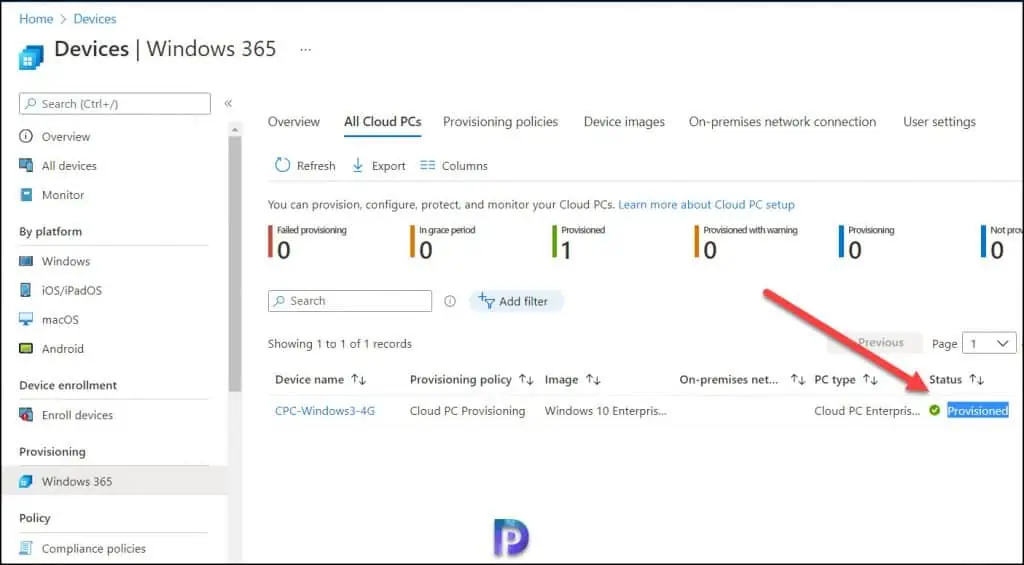
You can check the provisioning status of Cloud PC with following steps:
- Sign in to Microsoft Endpoint Manager admin center.
- Go to Devices > Windows 365 node.
- On Windows 365 page, click All Cloud PCs and search for the Cloud PC with its name.
- The Cloud PC name along with the Provisioning status are displayed on the screen.
Steps to Reprovision a Cloud PC
Perform the following steps to Reprovision a Cloud PC for a user:
- Sign in to Microsoft Endpoint Manager admin center.
- Navigate to Devices > Windows 365 node.
- From Windows 365 node, click on All Cloud PCs tab to view all the available cloud PCs.
- Select the Cloud PC that you want to Reprovision and click the remote action Reprovision.
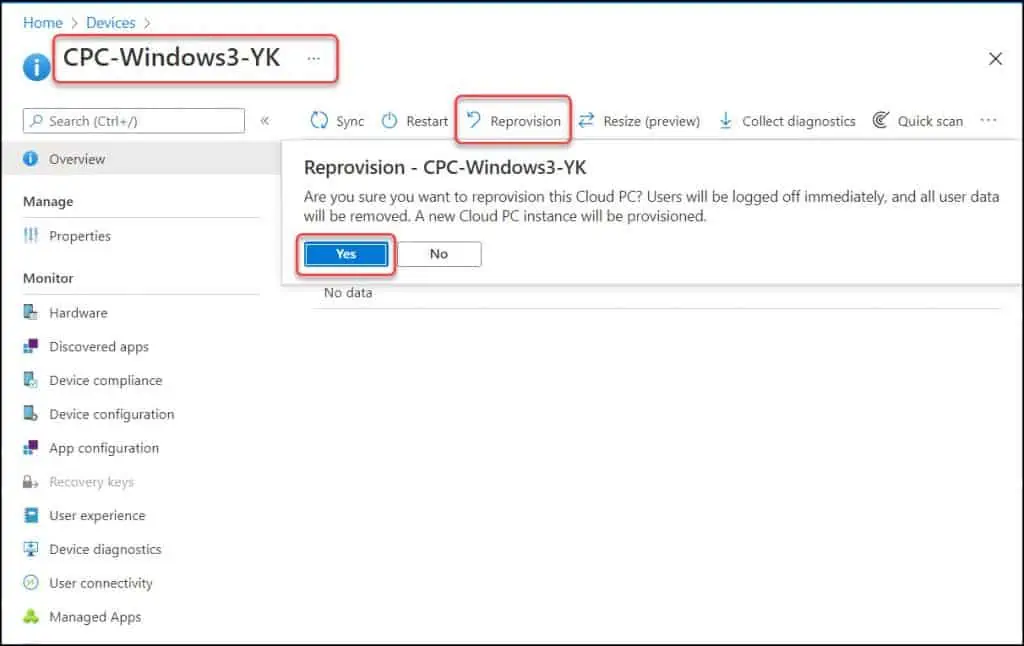
When you Reprovision a Windows 365 Cloud PC, you get a information box with following details.
“Are you sure you want to Reprovision this Cloud PC? Users will be logged off immediately, and all user data will be removed. A new Cloud PC instance will be provisioned“.
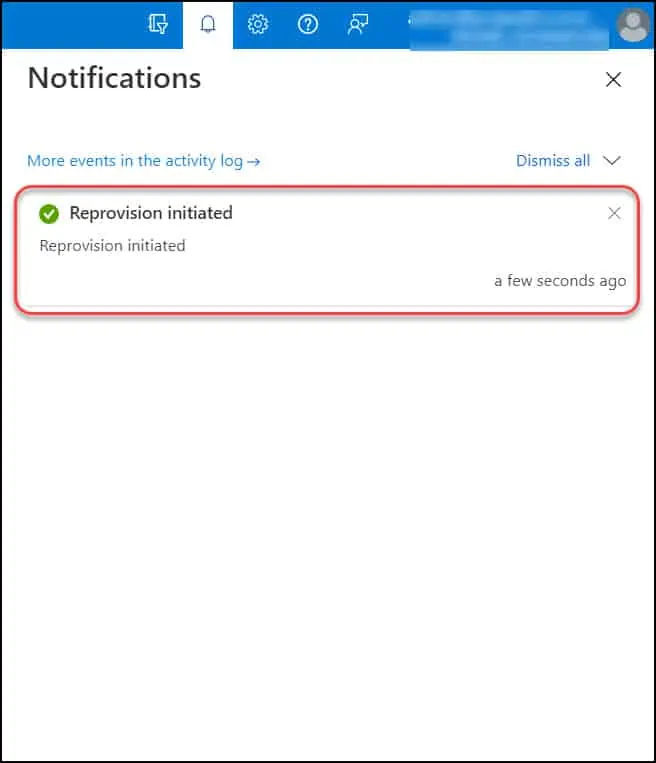
To continue with the Cloud PC Reprovisioning process, select Yes. Shortly a notification appears in the top-right corner of the screen.
“Reprovision Initiated“, this confirms the Reprovision of Cloud PC has begun.
Monitor Cloud PC Reprovisioning Process
When you initiate the Reprovisioning of a Cloud PC, the Cloud PC VM will be deleted and a new Cloud PC instance will be created.
The Windows 365 service initiates the Reprovisioning process and the provisioning status of Cloud PC is changed from Provisioning.
During the Cloud PC Reprovisioning process, you will notice the following statuses in the Intune portal.
| Cloud PC Reprovisioning Status | Description |
| Pending | This means you have just initiated the Reprovisioning of a Cloud PC. |
| Provisioning | Indicates the Cloud PC Reprovisioning is in progress. |
| Provisioned | This means the Cloud PC has been provisioned successfully. |
| Failed | Indicates that Cloud PC provisioning process has failed. This requires further troubleshooting based on error. |
| Warning | This requires further troubleshooting based on warning. |
When you initiate the Reprovisioning of a Cloud PC, the initial status that you see in Windows 365 node of Intune portal is “Provisioning“.
Reprovisioning a Cloud PC can take around 30-60 minutes of time to complete. During the Reprovisioning process, the device records are immediately disabled from Azure AD.
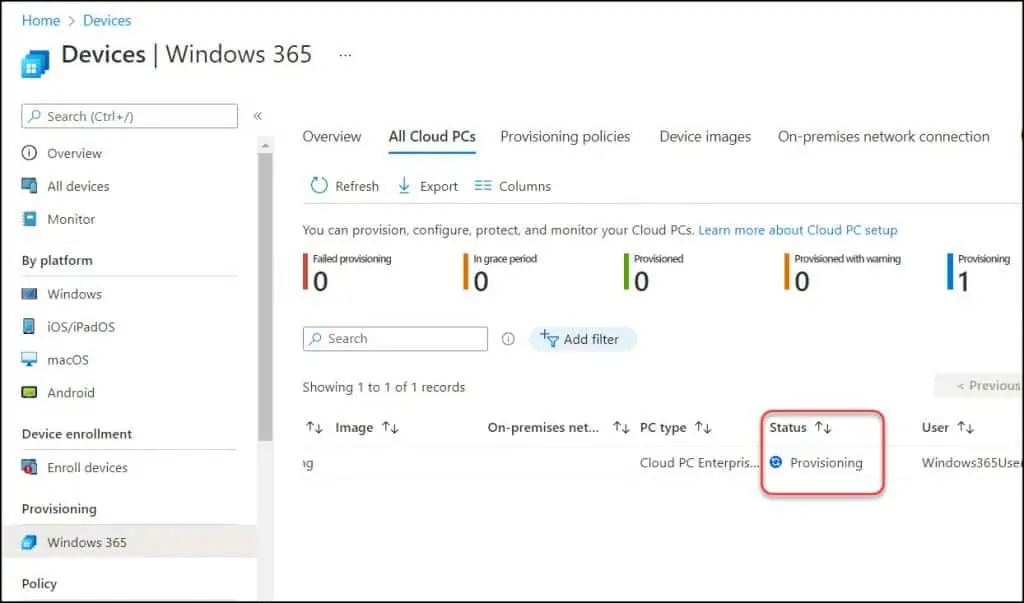
Once the Reprovisioning is completed, you will notice that the status of the Cloud PC is changed to Provisioned. The Reprovisioned Cloud PC gets a new name which can be seen in the Intune portal. The new Cloud PC device details are also available in the Azure AD.
Access the New ReProvisioned Cloud PC
After the Reprovisioning process is complete, the user can now access the Cloud PC. You can use two easy methods to access a remote Windows 365 Cloud PC – Windows 365 home page and Microsoft Remote Desktop client. Here is a useful guide that covers the steps to access Cloud PC.

Hi Prajwal,
is it possible to trigger the reprovisioning of a Cloud PC as a logout script?
We want our users to log off and that the Cloud PC they used before is being automatically reprovisioned after logoff…
Greetings from Cologne,
Steffen
I don’t think that is supported but I will find the right answer for this.