Fix: RSAT Tools Installation Error 0x800f0954 on Windows
In this post, we will look at how to resolve RSAT Tools Installation Error 0x800f0954. The error 0x800f0954 appears while installing .NET Framework 3.5 or an optional feature on Windows computers.
The RSAT error 0x800f0954 appears on both Windows 10 and Windows 11 devices while using the DISM command-line tool to install additional features.
In my previous post I showed the steps to install RSAT tools on Windows 10. I covered two methods to install RSAT tools, a GUI based and another is using DISM.
On one of my Windows 10 VM, I encountered add-windowscapability failed error code = 0x800f0954. Let’s find out the reasons why you encounter error 0x800f0954 during RSAT tools installation and solution to this error.
Why do you get Error Code 0x800f0954?
There are many reasons why you could encounter error 0x800f0954 during RSAT usage.
- Unable to access Windows Update server: If a domain joined computer cannot access Windows Update server in the network, the RSAT installation terminates with 0x800f0954 error. In this case, you can resolve the issue by bypassing the WSUS.
- Install .NET Framework using PowerShell: If you’re trying to install an older .NET Framework package, trying doing it from a PowerShell window to avoid the 0x800f0954 error.
- Group policy preventing the feature installation: When you are trying to install a RSAT feature using DISM tool, a GPO could be the reason for error 0x800f0954. You can resolve the issue by enabling the “Specify settings for optional component installation and component repair” policy.
RSAT Error 0x800f0954
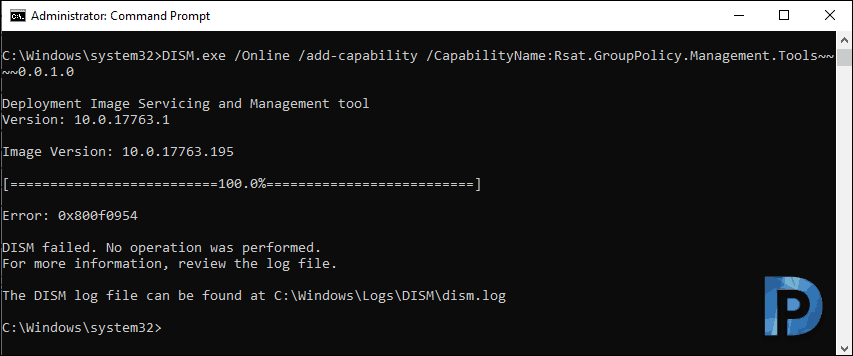
While installing RSAT features using DISM command line tool on my Windows computer, I encountered error 0x800f0954. The feature failed to install with the following error details:
Error 0x800f0954
DISM Failed. No operation was performed.
For more information, review the log file. The DISM Log file can be found at C:\Windows\Logs\DISM\dism.log
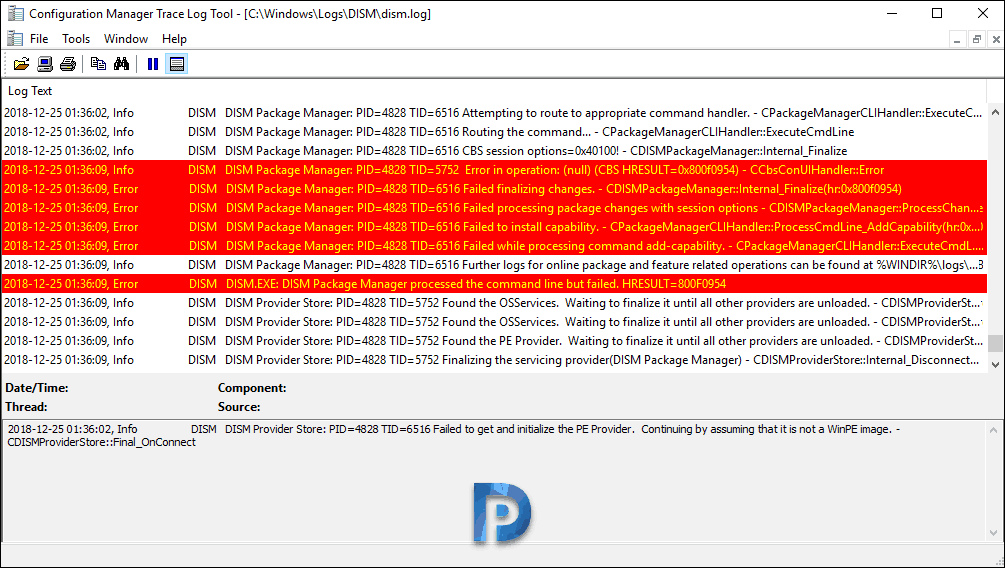
By default, the WindowsCapability logs are stored in C:\Windows\Logs\DISM\dism.log. Reviewing the dism.log, I found multiple errors.
The below information shows the error details logged in dism.log file. Among the errors in dism.log, one prominent error was 0x800f0954. So if you are seeing the same error while installing RSAT tools on Windows computer, head to next section for the solution.
DISM Package Manager: PID=4828 TID=5752 Error in operation: (null) (CBS HRESULT=0x800f0954) - CCbsConUIHandler::Error
DISM DISM Package Manager: PID=4828 TID=6516 Failed finalizing changes. - CDISMPackageManager::Internal_Finalize(hr:0x800f0954)
DISM Package Manager: PID=4828 TID=6516 Failed processing package changes with session options - CDISMPackageManager::ProcessChangesWithOptions(hr:0x800f0954)
DISM Package Manager: PID=4828 TID=6516 Failed to install capability. - CPackageManagerCLIHandler::ProcessCmdLine_AddCapability(hr:0x800f0954)
DISM Package Manager: PID=4828 TID=6516 Failed while processing command add-capability. - CPackageManagerCLIHandler::ExecuteCmdLine(hr:0x800f0954)
2DISM Package Manager processed the command line but failed. HRESULT=800F0954
Solution for RSAT Tools Installation Error 0x800f0954
You can resolve the RSAT error 0x800f0954 by enabling the “Specify settings for optional component installation and component repair” policy on your computer.
Fix RSAT Tools Installation Error 0x800f0954
- On your Windows computer, right click Start and click Run.
- Now type gpedit.msc and hit enter.
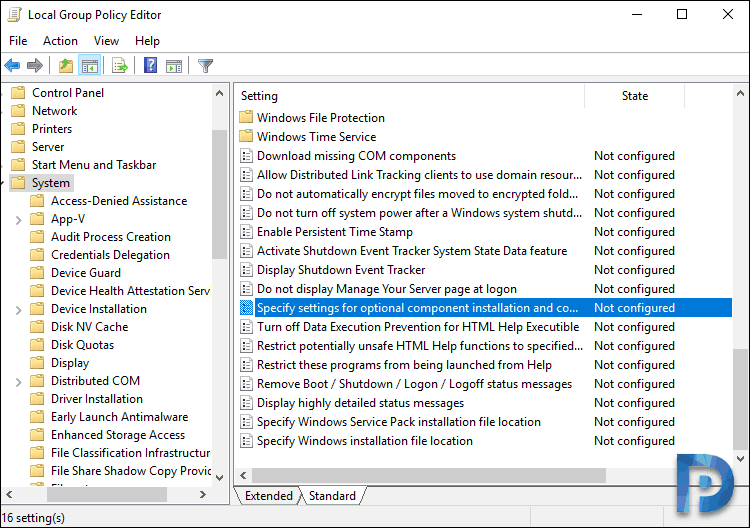
- In the local group policy editor, navigate to Computer Configuration\Administrative Templates\System.
- On the right pane look for policy named “Specify settings for optional component installation and component repair“.
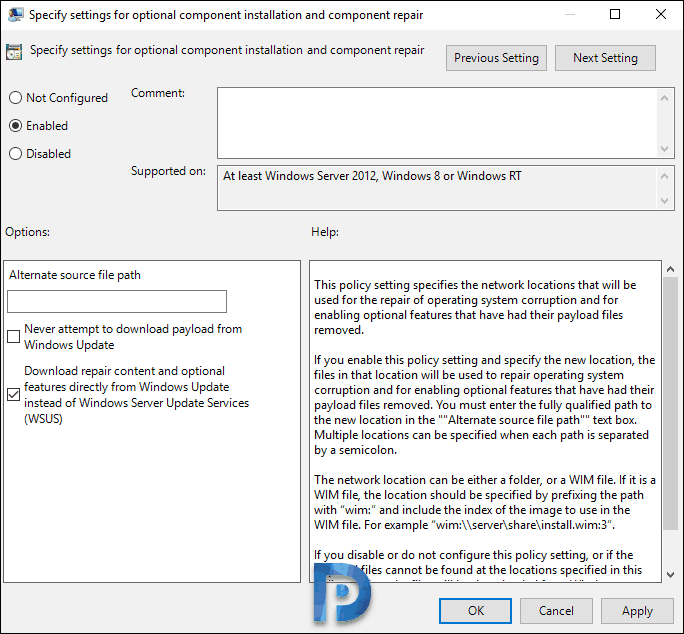
Right click policy setting and click Enabled. In addition to that, check the box “Download repair content and optional features directly from Windows Updates instead of Windows Server Updates Services (WSUS)“.
Click Apply and OK. Now open the command prompt on your computer and run the command gpupdate so that the latest policy settings are applied to the local machine.
Running the same DISM command now should install the RSAT feature without any errors.

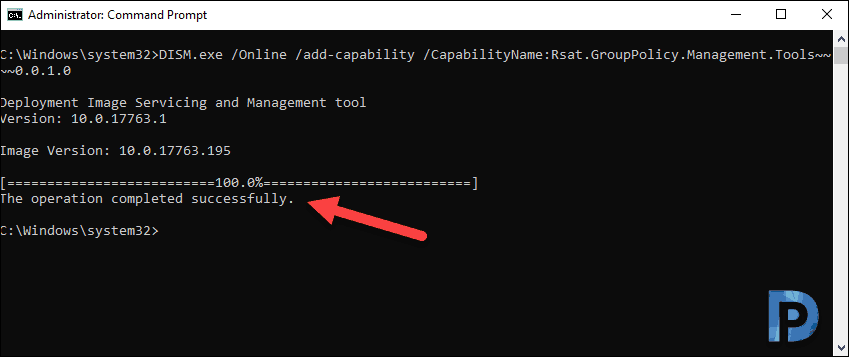
worked for me!
Thx!!!
Thank you. it works and saved me lot of time.
Genius, thanks
Sir, you saved my life, once again… Thank you!
thanks Prajwal
It worked for me too!! Excellent!!
Thanks for posting this, worked like a charm!
This worked for me, thanks very much!
Thank you!!!! Instructions worked perfectly.
thanks a lot man
How do you address this issue if the device is managed by Azure Configuration Profiles and not Group Policy as the path can not be left blank?
Prajwal Desai,
Thank you so much! This worked like a charm! You made my day!
Hello, I found this useful, but still installation gets stuck at 5.9%. I have company laptop tho, they will still block it? Is there other way to install this manually from a file? Any of the optional features are not installing.
It could be blocked by your firewall. You should contact your local administrator guy.
This worked perfectly. Thanks for the post.
In addition to this follow below steps:
1. regedit
2. HKEY_LOCAL_MACHINE \ SOFTWARE \ Policies \ Microsoft \ Windows \ WindowsUpdate \ AU
3. UseWUServer -> 0
4. net stop wuauserv && net start wuauserv from cmd
Thank you, Harry! Your advice helped to solve the issue
THANK YOU FOR THIS!!!
This was the last step needed in my domain where I have SCCM/WSUS.
– Shawn
This helped me to avoid a Reboot after setting UseWUServer -> 0.
Thanks MUCH !
IT WORKS!!!
Thank very much Prajwal, god bless you !!
You’re the man. Thanks!!
How do you do this then if your PC has no internet connection ? can the sources still be downloaded somewhere ?
Oh my goodness so glad to have found this one!
Thank you! Worked great on 20H2
Get-WindowsCapability -Name RSAT* -Online | Add-WindowsCapability -Online
Thx Man ! I love you !
Thank goodness for this post.
thanks a lot. it works for me
EXCELLENT write-up!
Thank-you for both posts. That worked.
that worked perfectly, thank you! also, congrats on the MS MVP awards, very cool.
Oh yes, works like a charm! Thank you so much!
Thanks a lot. It worked.
Thanks a lot!
Thank you so much!!
Thank you!!!
Worked! Thanks, two thumbs up!
Thank you, it worked !
win 10 1903 had to use same gpedit as above then ran “Get-WindowsCapability -Name RSAT* -Online | Add-WindowsCapability -Online” rather then dism
I have the same issue, win 10 1903. even “Get-WindowsCapability -Name RSAT* -Online | Add-WindowsCapability -Online” is not working rather getting error, please help
C:\>DISM.exe /Online /add-capability /CapabilityName:Rsat.ActiveDirectory.DS-LDS.Tools~~~~0.0.1.0
Deployment Image Servicing and Management tool
Version: 10.0.18362.1
Image Version: 10.0.18362.535
[==========================100.0%==========================]
Error: 0x8024002e
DISM failed. No operation was performed.
For more information, review the log file.
The DISM log file can be found at C:\WINDOWS\Logs\DISM\dism.log
C:\>
Save my day!!
Same my day!
This script did not work for me, I am on a Corporate GPO. Any help please
Thanks a lot !
Awesome. Worked for me. Thanks
Perfect thanks! A great fix for LTSC users.
Thank You, this was making me crazy.
Hello Prajwel,
How can we set the local group policy through PowerShell? I’m trying to install .Net3.5 but have the same issue, I wantd to script the whole thing so the GP is changed before the .Net installation, then I’ll package in SCCM (I have seen your video for packaging but obviously won;t work if the GP is not updated)
Spot on, thanks a lot
Dude… God bless you 🙂
Thanks a lot for the fix 🙂
What about an offline installer? That’s really what I need in my environment.
You need to acquire W10 1809 Features ISO (2nd CD of “language packs” ISOs for 1809) and then use it as your installation source to create offline installer either with PowerShell cmdlets or DISM. This will create RSAT package into custom folder of your choice (with all tools or ones you select on cmdline) for you to distribute. You will then point PS cmdlet to install RSAT into that folder instead of using -Online switch which needs network conectivity (WSUS or Windows store).
That one saved the day, thank you!
YEESSS you save my day!
Thank you
After one of the hardest Fridays at work, this was a god send – thank you.
You would think someone at Microsoft would mention that installing RSAT Through the Add-WindowsCapability commandlet requires communication with windows update instead of WSUS in a domain environment….
This was definitely a lifesaver after searching endlessly why AD DS LDS was not working on v1809, thanks a lot 🙂
Thanks for the comment. Glad to hear that.
This works great!!!
Thank you
Thank you! It works perfectly!
Glad to hear that.
Hi,
Thanks for sharing the solution. This can happen because the computer is configured to use WSUS/SCCM and RSAT for W10 1809 are not available on it. The solution is to use this workaround.
Cool..